Checklist_Tips for Creating an Online Course

23 Research-based strategies for creating an online course that supports diverse learners:

  1. Use consistent layout amongst teachers working on a team to help students navigate resources quickly and easily
  2. Design with consideration for students with colorblindness
  3. Use tools built into your LMS to limit the number of apps or sites that students access
  4. Use graphical indicatorsflaticon—to support resource documentation
  5. Organize course content into weekly sections
  6. Use resources that include closed captioning and transcript
  7. Create an introductory video tour of the learning management system (LMS)
  8. Plan for asynchronous and synchronous collaborative assignments that can visualize students’ thinking through multiple means of expression (i.e. audio, video, text, drawing, animation, simulation, etc)
  9. Provide video tutorials on using new technology for students with limited experience
  10. Provide exemplars or templates to support high-quality discussion posts
  11. Plan for team-building activities that foster a sense of community
  12. Prepare a schedule for personalized support for struggling learners to build confidence and proficiency by using coaching technology such as Zoom, Meet, Teams, Cisco Webex, GoToMeeting, etc
  13. Plan for an orientation process where students can share their experiences and concerns
  14. Plan for ways to monitor students’ progress using formative assessments in a synchronous and asynchronous environment
  15. Prepare to be flexible
  16. Prepare to create a dynamic course that incorporates students’ ideas, experiences, needs, and preferences
  17. Place priority on learning outcomes instead of activities and technology
  18. Consistently reflect on the alignment among the learning outcomes, tasks, and technology
  19. Select multimedia resources using the R2D2 model—read, reflect, display and do— to support various learning styles
  20. Create a reciprocal relationship with students where you learn with and from them
  21. Timely interactions are critical to initial success so be prepared to work the hardest in the first few weeks when everything is new
  22. Survey students quarterly using the MARK protocol—modify, add, remove, and keep—to improve your online course
  23. Join or create a professional learning team or community to continue your learning

Reference:

Christopher, P. O., Jennifer, V. L., Hill, S. L., Luciano da Rosa dos, S., Noha, F. A., & Carol, J. (2017). A journey through the development of online environments: Putting UDL theory into practice.

Strohmeyer, D., & Jureh, L. (July 17, 2020). Assessment for Blended Learning ASCD Respond, Reimagine, Restart!, Virtual Conference.

Posted in Distance learning | Leave a comment

Checklist: Awesome Tools for Distance Learning

Here are some awesome tools that I discovered this summer and how I am going to use them in 2020-2021:

  1. Jamboard is an interactive whiteboard that is part of the GSuite Family. I will use the sticky note to collect and sort students’ questions and responses as a quick formative assessment. Thanks to Paul Anderson, I will have my students brainstorm and map science investigation ideas in collaborative groups.
  2. Formative is a web app for creating standards-based assessments. Despite the name, I will use this for both formative and summative assessments.
  3. Book Creator is an app for creating digital books. I love the suggestions provided by Dr. Monica Burns in 15 Science Projects for Book Creator classrooms. I will definitely adapt these ideas for quarterly projects.
  4. Loopy is a simple simulation generator for creating models of systems and phenomena. Thanks to Jon Darkow, I will have my students create dynamic drawings of systems and phenomena being investigated in class.
  5. Explore Learning is a subscription-based interactive science simulation resource that builds students’ conceptual understanding through, data collection, interpretation, and analysis. This will provide tremendous support as an inquiry-based virtual experience.
  6. Pear Deck is a formative assessment tool that is a Google and Microsoft Teams Add-in; allows students to submit anonymous responses. Great for those times when you want to discuss your “favorite no.”
  7. Talking points is a free translation app for communicating with students’ parents and families.
  8. Poll Everywhere is a web-based polling app for getting capturing students’ ideas in an instant in multiple formats: multiple choice, word cloud, competition, true-false, open-ended, ranking, clickable image activity, self-paced survey,  question and answer, and numeric rating.
  9. Mindmup is a Google and Microsoft Teams Add-in that is great for brainstorms and notetaking
Posted in Blog Post Index, Distance learning, Tech Corner | Leave a comment

Tips for Supporting Struggling Students

Never Work Harder Than Your Students

After completing each school year, invariably, I examine my curriculum, formative assessments and standardized test results to determine what I need to change to make the subsequent year even more successful for students. While engaged in the reflective process post the 2012-2013 academic year, I came across the book Never Work Harder than Your Students by Robyn Jackson, a rising star in the curriculum and instruction field.

Upon initial inspection of the title, it might illusively appear to be a step-by-step guide for being a lazy teacher; however, it’s quite the opposite. In this page-turner, Jackson shares effective strategies for becoming a master teacher.

According to Jackson, master teachers exhibit 7 principles:

  1. They start where their students are.
  2. They know where their students are going.
  3. They expect to get their students to their goals.
  4. They support their students along the way.
  5. They use feedback to help them and their students get better.
  6. They focus on quality rather than quantity.
  7. They never work harder than their students.

She designed a Mastery Self-Assessment which is a multiple-choice survey addressing teachers’ approaches and beliefs about instruction, assessment, and curriculum.  Each question is linked to a mastery principle; as a result, completion of the survey can be used to diagnose a teacher’s weakest and strongest areas along the continuum of being a mastery teacher.

I started off by completing the Mastery Self-Assessment to determine my performance along the continuum from novice to mastery teacher. Based on the results, I decided to change my approach on how I would support my weaker performing students in the 2013-2014 academic year. In the past, I would offer lunch and after-school tutorials to students who were not successful on formative and summative assessments. According to Jackson, this approach was reacting to students’ failure after the tasks were completed, instead of being “proactive about developing interventions before students fail.”

During 2013-2014, I instituted several proactive intervention strategies. First, I paired struggling students with academically successful students as daily study partners in the cafeteria.  Second, since I was on cafeteria duty during that time, periodically, I would play review games with the struggling students to making the learning fun. They were always excited to share with me what they had reviewed with the tutors from their interactive science notebooks. Third, I availed myself for homework help in the cafeteria and after school so that students would have support on challenging homework assignments.  I gave extended time to students who needed it on long assignments and assisted them in creating a manageable schedule to successfully complete these assignments. Fourth, all complex projects were completed in class so students had the support of school resources (i.e. teacher, computer, manipulatives, etc) and their peers. Fifth, cooperative groups were always dynamic and were revised based on students’ readiness level and interests based on the given task.

Collectively, these proactive intervention strategies were proven to very effective for my struggling students. On the June 2014 Regents Living Environment, 98% of my struggling students received scores from 71%-93%. 100% of my academically successful students had scores ranging from 88%-97%.


Posted in Blog Post Index | Tagged , , , | Comments Off on Tips for Supporting Struggling Students

Backing Up a Large Course in Moodle

I had been using MOODLE 2.4 for 5 months when I noticed that I had lost the ability to perform my weekly course backup for one of my courses inside of MOODLE.  At the time, I was not sure what had triggered the inactivation of this function so I foraged the MOODLE forums to seek out solution. After extensive research, a few users recommended increasing the memory and execution time in the php.ini file.  I was not able to change the parameters established my host company because my contract was for shared hosting, which denied access to changing these features.  However, through research and trial and error, I came up with 2 successful solutions.

Through research, I learned that I could back up the entire website from the control panel, thus saving my course.  While this approach preserved the entire website including the courses and their corresponding data, I lost the ability to restore or share only the course because their file extensions differed. While this was not my ideal approach, I continued to utilize this method until the end of the course when students were no longer accessing and updating course work in MOODLE.

During the summer, from trial and error, I recognized that I could import activities, blocks and filters from previously generated courses into a shell course. Consequently, I created 4 shell courses with the exact parameters as the problematic courses. Then, I migrated only 9 weeks of activities to each new shell course from the problematic course. Then, I was able to successfully backup within MOODLE again.  Honestly, it was painstakingly long, however I had regained the ability to complete a course back so I was happy.

Since I had collected a lot of useful testing data and exemplars of student work in the original course, I later decided to keep this course as template for data analysis.

Posted in Blog Post Index | Tagged , , , | Comments Off on Backing Up a Large Course in Moodle

What’s the Difference? Concepts vs. Principles

In my first year of teaching, I quickly recognized that the class text was filled with a plethora of facts that were impossible to sufficiently uncover within the time frame allotted in the school year. Consequently, I had to quickly determine what was worth teaching and what could be ignored. Thus, my journey to skillfully write and effectively implement quality curricula,  (i.e. one that thoroughly prepared students to demonstrate mastery on standardized exams and provided the prerequisite knowledge and skills for college), had begun.  From reading Robert Marzano’s Dimensions of Learning (DoL), I immediately recognized that at the heart of all curricula are concepts and principles. Concepts and principles dictate what is worth teaching in a given curriculum. Also, concepts and principles provide an organizational scheme of how to uncover knowledge to facilitate learning.

According to Marzano,  concepts are “single words or phrases that label entire classes or categories of persons, places, living and nonliving things, and events.” Concepts can be cross-disciplinary or domain-specific.  They have key characteristics that are shared by all examples of given concepts. These characteristics consist of the knowledge that is worth knowing or understanding; and therefore, is worth teaching.

In my biology curriculum, a domain-specific concept is the “single word” protein. All proteins share the following characteristics: they are made of amino acids; the order and sequence of their amino acids are unique; their sequence and functions are determined by DNA; they are made by ribosomes; their shape is important to their function. As a result, all proteins (i.e. hormones, enzymes, antibodies,  and receptors) that we encounter in the class must possess these characteristics. First, we uncover these characteristics in a series of lessons. Later in addressing the various proteins in their respective units, we emphasize similarities (i.e. characteristics) and also compare them in terms of their differences. Thus, students have several opportunities to revisit and review the key characteristics of proteins when learning about specific examples throughout the year. Also, I use this as an opportunity to reteach or emphasize salient points that students may have found problematic during the initial study of proteins, while still adhering to the curriculum schedule.

A cross-disciplinary concept in my biology curriculum is cycle.  All cycles share the following characteristics: they repeat themselves; they exhibit a pattern, and they are predictable. As a result, when studying the menstrual cycle, we examine the major events for these features. Students interpret the cycle from 3 perspectives (i.e. hormones, egg, and uterus).  These characteristics facilitate students’ recognition of repetitious and predictable patterns displayed by each participating hormone, the egg, and the uterus. This is accomplished by providing students with an organizational framework for recalling and interpreting information displayed in the cycle. In addition, these characteristics also serve as mental checklists for me to develop and assess learning experiences that facilitate internalization of the knowledge and skills being addressed by the concept as it pertains to the unit.

In contrast, principles are statements that “articulate rules or relationships that can be applied to a number of specific situations.” In essence, they are abstract statements that identify characteristics of classes or categories of persons, places, living and nonliving things, and events. While concepts provide the label for a class or category, principles provide abstract statements or characteristics.

In the biology curriculum, a principle that we study is proteins (i.e. enzymes, antibodies, and receptors) have a complementary shape to their target molecules (i.e. substrate, antigen, and hormones/neurotransmitters). Therefore, in every unit where these respective proteins are addressed, I know it’s vital to provide students with learning experiences to symbolically represent the interaction that exists between the protein of interest and its target molecule.  With each transition from unit to unit where these proteins are addressed, students recognize the relationship and make essential connections across units. As a result, when students encounter new proteins, they can use this characteristic to make logical predictions about the behavior of the protein.

Posted in Blog Post Index | Tagged , , , , | Comments Off on What’s the Difference? Concepts vs. Principles

Moodle Quiz Surpasses the Others

The quiz feature of MOODLE 2.4 is the best online assessment tool that I have worked with as an educator. I started using the quiz feature of MOODLE  2.4 in 2013-2014 as a replacement formative assessment tool for a popular brand.

Prior to using MOODLE 2.4, to prepare my students for each unit test, I would assign several multiple-choice questions that would be electronically graded by the online program and the short answers I would grade by hand. Despite the benefit of providing updated Regents questions, I was limited by the type of questions that I could ask that would be electronically graded. I wanted a program that would give the students immediate feedback, along with providing the teacher with tools that assessed content knowledge using various styles of questions. Moreover, I wanted the assessment tool to facilitate the analysis of students’ assessment results.

MOODLE 2.4 offered these solutions. I was able to assess students’ performance using the following question styles:

1. Sentence Arrange

Cloning_Sentence Arrange

2. Labeling

Translation_Labelling

3. Sentence Completion without Word Bank

Transport_Sentence Completion

4. Sentence Completion with Word Bank

Enzymes_Drag and Drop_Text

5. Numeric Response

Base Pair_Calculation

Each new question style provided students the opportunity to use different types of thinking skills that are not often measured in multiple-choice.

In addition, MOODLE generated easy to use color-coded item analysis spreadsheets of students’ results, which made it easier to pinpoint questions that student groups found problematic. These questions served as a teaching tool in subsequent reteaching exercises.

Photoysnthesis and Respiration_Sample Item Analysis

Also, I was able to observe a class’ performance displayed in a bar graph and a similar display was generated for a given class’ performance in comparison to the 8-grade cohort. Thus, it was easy to discern the number of students that were achieving mastery and those that needed targeted instruction. Often, I would partner these students to help each other during lunch tutorials in the cafeteria.  In this mutualistic relationship, weaker students received additional instruction to master the content and stronger students reviewed and refined their understanding of already learned content to prepare for their summative assessments. Periodically, I would monitor the peer tutorial to assess if the partnership was truly productive for each partner and made modifications when necessary.

Photosynthesis and Respiration_Bar Graph

Because of MOODLE, I was using the limited time that classroom teachers have between formative assessment and reteaching where it was most beneficial: focusing only on the analysis and reteaching, rather than on the generation of the spreadsheets and graphs. All of these spreadsheets and graphs were being generated and updated by MOODLE as each student completed their assessment. A win for me since my administrators were advocating increase use of data analysis in the classroom.

Posted in Blog Post Index | Tagged , , , | Comments Off on Moodle Quiz Surpasses the Others

What’s the difference? Goal vs. Objective

Until recently, I have always used the terms goal and objective interchangeably as if they were the same. However, I knew that I was committing a curriculum faux pas. For someone who cares deeply about the curriculum, I felt that I had to mentally clarify the fine nuances between these two terms if I was going to elevate my instructional practice. By reading Robert F. Mager’s, Preparing Instructional Objectives, I was able to clarify those subtle differences. Thus, my quest to become proficient at writing clear objectives began.

According to Mager, an objective dictates to the teacher, what is worth teaching. It is a clear statement that describes the instructional outcome (i.e. the expected behavior that successful students should exhibit when they have achieved mastery).  Since the learning outcome is directly linked to the quality of the instruction, and the quality of the instruction depends on the clarity of the objective, it behooves teachers to prepare for instruction by starting with clear objectives. Map_Objective-Learning OutcomeMager recommends that an objective must include:

  1. Performance: states what the learner is able to do
  2. Conditions: describes terms under which the performance is to occur
  3. Criterion: states acceptable performance

Normally, I would only indicate the performance in an objective and exclude the conditions and the criteria. For example, I would write: the objective is to construct a line graph. However, using the guidelines from Mager, I revised the objective as follows: Given a data table, students will be able to construct a line graph by writing the title to include both independent and dependent variables; numbering the intervals for both x and y axes; listings the variables and their corresponding units for both the x and y axes; adding a key when applicable; and plotting and connecting the data points without extrapolation, with 100% accuracy when any of these elements are required. In the revised version, I have underscored all the overt behaviors that must be revealed in the body of work provided by the students in order to achieve competency for this objective. No longer will students have to guess what I mean by “to construct.”  This organizes students by clearly expressing how the objective must be accomplished.  In addition, I have included the condition in which the performance will be assessed, when given a data table. Therefore, students know that I will ask them to construct a line graph only when presented with a data table and not under any other conditions.  Also, I have given the criteria for acceptable performance, 100% accuracy. Consequently, students know that in order to receive credit, all overt behaviors must be completed without errors; partial credit will not be given for inconsistent intervals, incomplete titles, etc.

A goal, in contrast, is an abstract statement that explains what teachers expect students to know and understand. Since goals are abstract, they can only be measured using indicator behaviors (i.e. performances or visible behaviors) during formative and summative assessments. In essence, objectives can be used to achieve goals.

A good strategy I have found to write a goal is to start with the following sentence prompts: I want students to understand ___ or I want students to know ___. Things that I want my students to know are big ideas or enduring understandings. These are principles, conceptual themes, and issues in the curriculum. For one goal in my living environment curriculum, I wrote: I want students to understand that proteins (i.e. enzymes, receptors, and antibodies) recognize their target molecules (i.e. substrates, hormones, and antigens) by their complementary shape. I was able to measure the students’ achievement of this goal via two performances or indicator behaviors. When given a symbolic representation of a specific enzyme, receptor, or antigen, students are able to draw a symbolic representation or create a model of the respective target molecule, with 100% accuracy.

By mentally clarifying the nuances between these two terms, I was more equipped to provide improved instruction to my students. My instructional approach improved because now I was armed with foolproof strategies to unravel the hidden performances embedded in a goal. Since I was explicitly stating all acceptable performances (for both goals and objectives), I became more cognizant of creating learning experiences that included these measurable behaviors. This also ensured that I would never forget to teach a critical feature of a lesson or unit because these measurable behaviors were serving as my mental checklist. Along with improving instruction, I also used these strategies to transform my construction of assessments to improve their internal validity. The overt behaviors or performances served as guidelines in the type of questions that I selected or generated for my formative and summative assessments. As a result, my assessments were aligned to their respective instructional approaches and objectives.

Posted in Blog Post Index, Jargon | Tagged , | Comments Off on What’s the difference? Goal vs. Objective

Revisiting Understanding by Design

UbD

Everybody is talking about it.  You may even own a copy of it, but perhaps you have not gotten around to reading it.  Or maybe at first glance, it may look intimidating. You might believe its elusive concepts such as big ideas and essential questions can be grasped by only the elite educators. However, this curriculum framework is worth understanding. Once mastered, Grant Wiggins’ and Jay McTighe’s Understanding by Design (UbD) will become one of the books you consistently revisit each year foraging for curriculum ideas.

I began using UbD during the first edition, while I was a chemistry teacher in New York City. Initially, my experience with the content was at the rudimentary stage; however, over the years, through practice building unit plans under the auspice of Teachers College’s Teacher and Leader Quality Partnership (TLQP) program, I have successfully transitioned to the experienced user stage.  I would never classify myself as a proficient user because, with every re-exploration, I find that I gain a deeper understanding of various features of the framework.

Upon my last re-examination of the book (during the last few weeks of Winter of 2013- 2014 academic year) for curriculum ideas, I began looking at the six facets of understanding as a tool for designing rigorous, differentiated learning experiences or differentiated assessments (i.e. the type of learning experiences or assessments that you envision for or expect from 21st-century science education). As Robert Marzano underscores in his book, Teaching and Assessing 21st Century Skills, these are learning experiences or assessments that require and challenge all learners to use cognitive skills (i.e. analyzing and utilizing information, addressing complex problems and issues, creating patterns and mental models) and conative skills (i.e. understanding and interacting with others, and understanding and controlling oneself).

At the time, I was introducing the menstrual cycle to my students. I knew I didn’t want to give daily lectures on the topic, nor did I want to stir controversy with class discussions. I knew I wanted to design differentiated learning experiences that targeted the concepts, skills, and principles of the unit.

One of the principles that I wanted to emphasize is that the menstrual cycle is interpreted from multiple perspectives (i.e. hormones, egg, and uterus). For interpreting the cycle from the various perspectives, I wanted students to gain the skill of interpreting the typical 3-perspective  cycle diagram and use the recognizable patterns to make predictions. Click: Figure 1.  I also wanted students to make the connection with a principle that they had been struggling with for several weeks; that is, hormones are able to locate their target cells because hormones have a complementary shape that matches the receptors located on the surface of target cells.

Using the “lenses” of the six facets of understanding, I generated 6 differentiated activities that targeted the various learning needs and assessed critical thinking. Click: Figure 2. These activities assessed critical thinking skills because each learning experience used novel materials; stimulated thinking instead of recollection of material already covered in class, and required students to explore viewpoints and make connections. As Susan Brookhart emphasizes in her book, How to Assess Higher-Order Thinking Skill in Your Classroom, these features are all crucial elements of assessments that hone critical thinking skills.

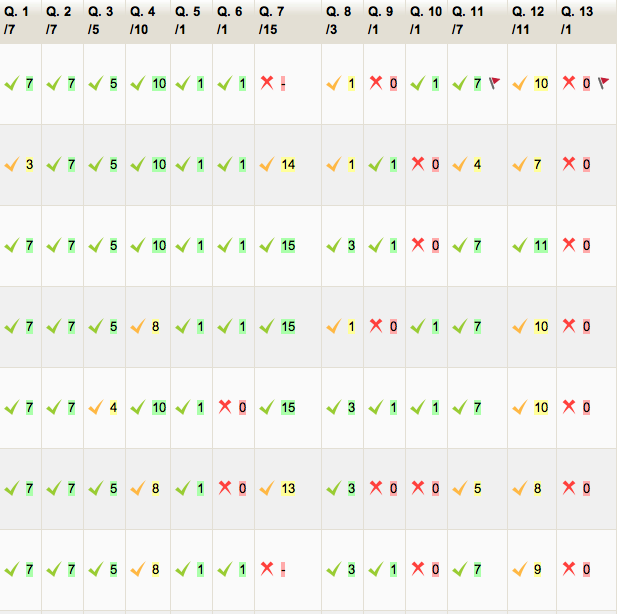
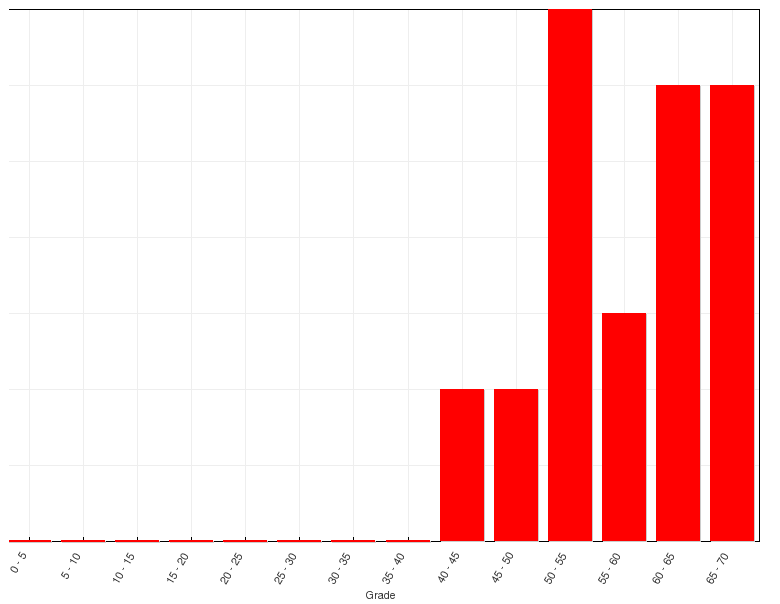
Students were assigned to four readiness groups based on their performance on previous formative assessments emphasizing pre-requisite content and skills from the curriculum. The chart used to facilitate the assignment of students into each differentiated group was adapted from Robyn Jackson’s, The Differentiation Workbook: A Step-by-Step Guide to Creating Lessons That Appropriately Challenge All Students. Click: Figure 3.

Since this was our first undertaking of a task of this magnitude or nature, each group was provided with a hint/checklist chart to facilitate the organization process, mitigate teacher dependency and promote more self-directed behaviors.   Click: Figure 4. At first, the students struggled as expected; however, by the second day, they were working cohesively and relying more on their partners and resources, and less on me.

It was quite a learning experience for all of us. I loved using the “lenses” of the six facets of understanding as a differentiated instructional strategy so much that I continued to use it for other conceptual themes in the living environment curriculum.  However, a few modifications were made. One change included shortening the activities from 6 to 3-4 facets. I felt managing 6 different activities at once proved to be mentally and physically taxing. A second adjustment included giving students who finished early opportunities to work on additional facets to gain extra credit. By the second assignment, students were more comfortable with the technique; as result, I adjusted the hint/checklist chart to show less scaffolding for each group, thus significantly increasing the rigor.


Posted in Blog Post Index, Book Reviews | Tagged , , , , , , , , , | Comments Off on Revisiting Understanding by Design

Checklist_Setting Up Moodle

  1. Decide on a domain name (www.yourname.com)
  2. Visit: HostGator website
  3. Click: View Web Hosting Plans
  4. Select Hatchling plan and the billing cycle you desire
  5. Click Order Now to launch the Order Wizard
  6. Enter your domain name to see if it is available
  7. Create and enter your username and security pin
  8. Enter your credit card information
  9. Click check box for add site lock to protect your personal information
  10. Click check box for terms and conditions and select create an account
  11. Check your email for a welcome package with your username and password for cPanel access
  12. Log in to cPanel
  13. Scroll to Software Services and click QuickInstall
  14. Scroll to eLearning Software and click Moodle
  15. Follow the direction given by the Wizard
  16. Record your username and password to access Moodle

Keep track of all usernames and passwords. You should have several sets after all transactions have been completed.


Posted in Blog Post Index, Tech Corner | Tagged | Comments Off on Checklist_Setting Up Moodle

My First Year Journey Using Moodle 2.4

Moodle


During Summer 2013, I decided to use the learning management system, MOODLE, to create a blended classroom environment. I must admit that it seemed like a daunting undertaking at first. After all, the big universities and school districts had their technology departments managing the hosting of their courses. Moreover, I never considered myself to be as tech-savvy as these individuals. Also, there was no 1800-HELPME for MOODLE. However, in my heart, I knew it was something that I had to investigate.

So for the first two weeks in August 2013, I read books written by MOODLE developers and watched YouTube videos prepared by experienced users. After I felt comfortable with the MOODLE jargon, I downloaded the latest version (MOODLE 2.5 at that time), and began incessantly practicing on my MAC laptop until I had set up two weeks of my living environment and health education courses.

When I felt ready for online hosting, I interviewed several hosting companies to see if they had the PHP and MySQL requirements for MOODLE 2.5. I decided to partner with HostGator because they had an installation wizard for MOODLE 2.4 that took all the guesswork out of the installation process.

Even though I practiced with MOODLE 2.5, I was able to successfully integrate both courses into MOODLE 2.4 without losing any content. I later realized that there were features of MOODLE 2.4 that I preferred that were removed from the upgrade in MOODLE 2.5. A win for me!

I knew the success of MOODLE at PEARLS would only occur if I prepared the administrators, students, and parents with sufficient information to access and navigate the site.  To prepare my grade-level administrator, I shared the purpose and benefits of using a MOODLE site. I also saved the website address to her favorites on her computer and gave her the guest access password to both courses.  To prepare my students, I requested their email addresses and parent contact information via a Google Docs survey, as the first homework on the first day of school. Initially, all students accessed the site as a guest until their accounts were uploaded to the site. In addition, I commenced subsequent classes with an overview of the schedule for the day consisting of acquiring daily notes, along with deadlines for homework,  labs, and tests. All of which were launched directly from the MOODLE site. In doing this, I wanted the students to gain comfort through familiarity and guided instruction. Also, I wanted them to recognize the importance of the site to their success in the course. To inform parents, I shared the MOODLE site during open house and parent conferences via demonstration and anchored the visual with a written checklist in the course syllabi. Also, all parents were given guest access.

To facilitate the transition for myself, I used the district online grading management system, eSchoolPlus,  along with the Google Docs survey, to create CSV databases consisting of students’ usernames, passwords, and email addresses. Each student was given a copy of their MOODLE access information and an electronic copy was stored in my Dropbox available for students who forgot their access information. This proved to be essential during the first few weeks of school while students were transitioning to this new way of accessing classroom content. Moreover, it was very useful as a “bulk upload” of students’ account information into MOODLE.

While there were a few missteps along the way, my students and I learned a lot and enjoyed the experience. Through my first year journey using MOODLE, I was able to:

  1. increase the amount of content covered in both courses by posting lecture notes for homework
  2. increase the rigor in both courses
  3. increase student-teacher communication via Moodle messaging
  4. increase my analysis of students’ data
  5. formatively assess students’ mastery of key principles, concepts, and skills using interactive quizzes
  6. decrease my grading load
  7. keep parents and students abreast of the weekly schedule for both courses
  8. share with students and parents,  weekly personalized progress reports

To access either course, visit: http://aleciaredway.com/moodle/. Then click the course name, living environment, or health education, and enter the guest password: _______.  Guest password will be provided via email to interested teachers.


Posted in Blog Post Index | Tagged | Comments Off on My First Year Journey Using Moodle 2.4